


Article content


Jovana Gojkovic
8 min read
Node.js web scraping offers a great opportunity for collecting data from any website and using it for your own purposes. For example, you can get product prices, reviews, news articles, or social media posts. In this guide, you'll learn JavaScript web scraping using Node.js and Puppeteer: Node.js is a runtime environment that lets you run JavaScript code on the server side. Puppeteer is a library that allows you to control a headless browser and automate web interactions. By the end of this guide, you'll be able to build a web scraper in JavaScript and extract data from any website you want.
Assumed knowledge and prerequisites
This guide is intended for beginners who want to learn how to perform web scraping with Node.js. However, you’ll have an easier time learning how to web scrape with JavaScript if you have some basic knowledge of HTML, CSS and JavaScript before reading this guide. You should also be familiar with the concept of APIs, how to make HTTP requests, and how to use your browser’s DevTools.
Build a JavaScript web scraper for static pages
At its core, web scraping in JavaScript is the art of knowing where (i.e. what HTML element) to get data from – and then process it correctly, turning a long string of raw HTML into actionable information. To perform web scraping with JavaScript, we’ll need a number of tools – let’s start with Node.js.
Set up a Node.js scraper
JavaScript was originally designed for user-facing aspects of websites – and Node.js allows us to use this language to create business logic of various apps: This way, we can create a Node.js web scraper. We can install Node.js from the project’s download page on any major platform – Windows, macOS, and Linux. Upon starting the installer, the installation wizard will guide you through the necessary steps.
You can check if the installation was completed successfully using the commands below, which will display versions of your Node.js and npm (Node.js package manager) instances:
node -v
npm -v
Add dependencies for the Node.js scraper
Let’s create a folder called testproject for our first JavaScript scraper – we’ll use it to store all project-related data:
mkdir testproject
cd testproject
Then, we’ll initialize a package.json file, which will store our Node.js web scraper's metadata. Using the second command, we’ll install libraries that make JavaScript web parsing possible:
npm init -y
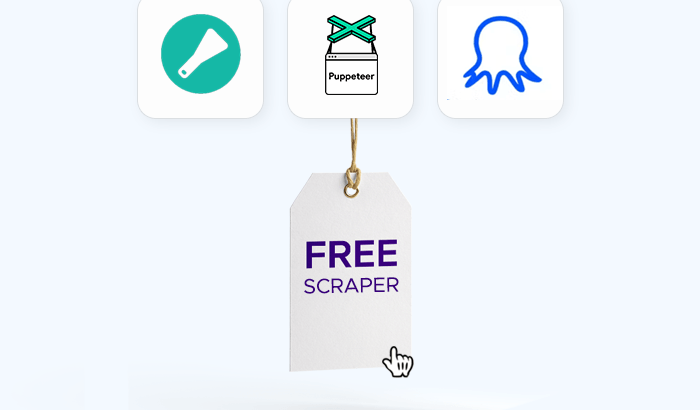
npm install axios cheerio puppeteerWe’ll use Axios to make HTTP requests to make JavaScript scrape HTML of a web page and Cheerio to parse the HTML and extract data using jQuery-like selectors. As for Puppeteer, check our detailed guide on this Node.js web scraping library out:
🏸 Further reading: Introduction to Puppeteer: Automating Data Collection
Collect HTML data with Axios
The first stage of JavaScript scraping involves getting the web page’s HTML structure. Let’s create a JavaScript file titled static-scraper.js and add this code snippet:
const axios = require('axios');
const url = 'http://books.toscrape.com/index.html';
    axios(url)
        .then(response => {
            const html = response.data;
            console.log(html);
        })
        .catch(console.error);
The const axios = require('axios') line is used to import the Axios library. In the next line, we’re defining the target URL via const url. A few lines later, we’re using const html to store the response data.
What website did we choose? For our first JavaScript website scraper, we can pick a website with a simpler structure – for instance, a sample e-book store designed specifically for testing web scraping in JavaScript.
Pick relevant HTML elements for scraping in JavaScript
Upon running the code snippet above, you’ll see a long string of unformatted HTML code. You could try to make sense of it, but making our Node.js scraper more precise is a better option. To accomplish this, let’s use your web browser’s dev tools to pick the correct HTML element:
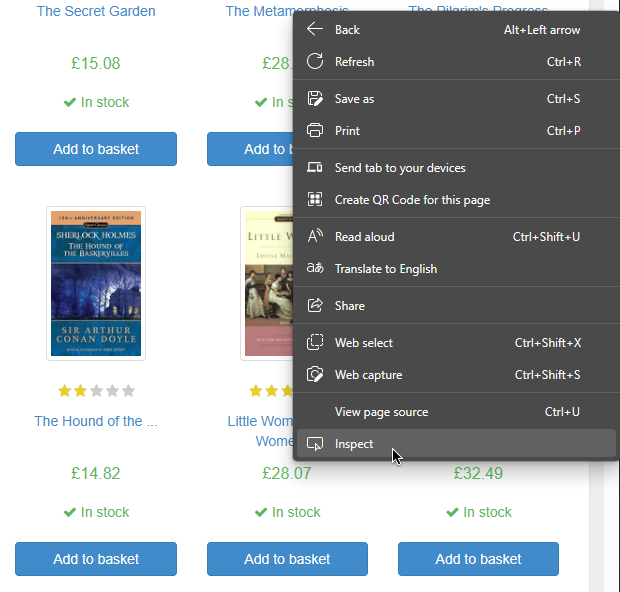
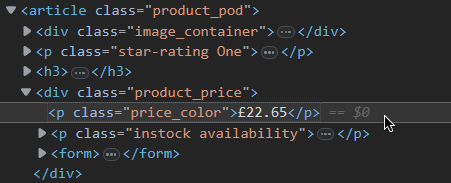
For instance, ff we want our Node.js web scraper to collect price data, we’ll need to target the price_color element class:
Process HTML and find relevant data
Having found the price data class, we can now use Cheerio to process and store this data. First, we import Cheerio via const cheerio = require('cheerio') and tell it to store price_color’s data in a variable priceData:
const axios = require('axios');
const cheerio = require('cheerio')
const url = 'http://books.toscrape.com/index.html';
    axios(url)
        .then(response => {
            const html = response.data;
            const $ = cheerio.load(html)
            const priceData = $('.price_color').text()
            console.log(priceData);
        })
        .catch(console.error);
Let’s run our Node.js scraper via node static-scraper.js – and we’ll get a list of fictional prices of various books.
Build a web scraper in JavaScript for dynamic pages
The challenge that comes with dynamic pages, as their name suggests, lies in dynamic content: Interactive web pages change their HTML structure on the fly to display new content (e.g., open a new store section without refreshing the page).
For our static web scraper on Node.js, we were picking the necessary classes (e.g., price_color) manually; on a dynamic page, however, classes may be generated randomly, which will break our bot. To address this problem, we can use the Puppeteer library – a tool that lets you create an instance of a Chromium browser and interact with dynamic web pages via the terminal.
🏸 Further reading: Introduction to Puppeteer: Automating Data Collection
Use Puppeteer with Node.js for web scraping

Let’s try scraping Reddit’s Personal Finance subreddit; specifically, we’ll target post titles. Let’s start by creating another JavaScript file, dynamic-scraper.js, and import Puppeteer using const puppeteer = require('puppeteer'). The whole code snippet is here:
const cheerio = require('cheerio');
    const puppeteer = require('puppeteer');
    let post_titles = [];(async () => {
        const browser = await puppeteer.launch();
        const page = await browser.newPage();
    }
We start by creating an empty array called post_titles where we will store our scraped data. Next, we define an async function so that we can use the await keyword inside it. This will make our code more readable and scalable than using .then() callbacks. Then, we use Puppeteer to launch a browser and open a new page in it. We use a try statement to handle any errors that might occur. Inside the try block, we tell the browser to go to a specific URL and wait for the page to load. Then, we use Puppeteer to get the HTML code of the rendered page:
try {
await page.goto('https://www.reddit.com/r/personalfinance/', {timeout: 180000});
let bodyHTML = await page.evaluate(() => document.body.innerHTML);
We have the HTML code of the page, but we need to use Cheerio to extract the data we want. Cheerio lets us use CSS selectors to find the elements we are interested in. We use ‘a[href*=“/r/personalfinance/comments”] > div’ as the first selector to specify where the data is located, and then we get the text inside the H3 tag with title = <code>(element).find(‘h3’).text(). To make the data more readable, we add the word “title:” before each data string with the push() method. This is how the final code looks like:
const cheerio = require('cheerio');
const puppeteer = require('puppeteer');
let post_titles = [];
(async () => {
    const browser = await puppeteer.launch();
    const page = await browser.newPage();
    try {
        await page.goto('https://www.reddit.com/r/personalfinance/', {timeout: 180000});
        let bodyHTML = await page.evaluate(() => document.body.innerHTML);
        let $ = cheerio.load(bodyHTML);
        let article_headlines = $('a[href*="/r/personalfinance/comments"] > div')
        article_headlines.each((index, element) => {
        title = $(element).find('h3').text()
        scraped_headlines.push({
        'title': title
        })
});
}
catch(err) {
console.log(err);
}
await browser.close();
console.log(scraped_headlines)
})();
Run your Node.js screen scraper via node dynamic-scraper.js – and you’ll get a list of Personal Finance’s front page posts!
Conclusion
Congratulations! You've just learned how to crawl data from a website using JavaScript with Node.js and Puppeteer. You've seen how to set up your project, launch a browser, navigate to a website, select elements, and extract data. Now you can use your web scraper to collect data from any website you want. You can also customize your scraper to suit your needs and preferences. For example, you can add more features, such as pagination, authentication, or proxy support. Happy scraping websites with JavaScript!
Frequently Asked Questions
Node.js is a great choice for web scraping because it can handle multiple web scraping requests parallelly, it has a large community that supports and creates web scraping libraries, it is cross-platform and versatile, and it is easy to learn if you already know JavaScript.
You can handle pagination and dynamic content by using a headless browser like Puppeteer, which can simulate user interactions and render JavaScript-generated content. You can also use techniques like scrolling, clicking, waiting, and evaluating JavaScript expressions to navigate through multiple pages and extract data.
You can save scraped data as a JSON file using Node.js by using the built-in
fs module, which provides methods for working with files and directories. You can use the fs.writeFile() method to write data to a file, and use JSON.stringify() to convert the data to a JSON format.
You can help your web scraper on Node.js avoid getting blocked or banned by websites when scraping data by following some web scraping best practices and ethics, such as respecting the
robots.txt file, limiting the number and frequency of requests, using proxies or rotating IP addresses, adding headers and user-agents to your requests, and avoiding scraping sensitive or personal data.
You can do Node.js page scraping from tables and lists using JavaScript by using Cheerio or Puppeteer to access the HTML elements that contain the data, such as table rows, table cells, list items, etc. You can then loop through these elements and extract the text or attributes that you need.
You can perform Node.js website scraping from websites that use authentication or cookies by using Puppeteer to automate the login process and store the cookies in a session. You can then use these cookies to make subsequent requests to access the protected data. Alternatively, you can use Axios to send the credentials or cookies as headers in your requests.
You can use Node.js for screen scraping from websites that use AJAX or React by using Puppeteer to render the dynamic content generated by JavaScript. You can also use Puppeteer's
waitFor() method to wait for AJAX requests to finish or for specific elements to appear before scraping the data. Additionally, you can use Puppeteer's evaluate() method to execute JavaScript code in the browser context.
Web scraping in Node.js is generally legal if you transform collected data in a meaningful manner: A good example would be scraping price data to create a price aggregation platform. However, some tech companies (e.g. LinkedIn) are less tolerant of web scraping. To learn more, read our overview of web scraping legality.


