


Article content

Vlad Khrinenko
5 min read
Maintaining anonymity and bypassing online restrictions has become a necessity for many users: Whether for managing multiple accounts, conducting market research, or accessing geo-restricted content, antidetect tools like GeeLark provide a powerful way to stay undetected. However, to maximize its effectiveness, you’ll need a reliable proxy service that ensures secure and anonymous browsing. Let’s explore how to integrate Infatica proxies into GeeLark – and maintain multiple identities without detection!
What is an antidetect phone?
GeeLark is an advanced antidetect phone designed to help users maintain online anonymity and bypass tracking mechanisms. Unlike conventional smartphones, which are deeply integrated with Google and Apple ecosystems, GeeLark operates on a customized Android-based system that removes tracking elements, masks device fingerprints, and allows for dynamic IP switching – and this makes it particularly useful for users who require multiple online identities without risking detection.
At its core, GeeLark employs sophisticated fingerprint randomization techniques to alter device attributes such as IMEI, MAC address, and screen resolution. It also enables seamless proxy integration, ensuring that each online session appears as though it originates from a different physical device and location.
GeeLark features
- Fingerprint randomization: GeeLark dynamically modifies hardware and software fingerprints, making it nearly impossible for tracking algorithms to link multiple sessions to a single device.
- Multi-Account management: Users can operate multiple online identities with unique environments, reducing the risk of bans and detection.
- Proxy compatibility: GeeLark supports residential, mobile, and datacenter proxies, allowing users to change their IP addresses effortlessly.
- Custom Android OS: A modified operating system removes built-in trackers and enhances privacy controls.
- Security enhancements: GeeLark blocks tracking scripts, prevents unauthorized data collection, and encrypts user activities for maximum anonymity.
GeeLark use cases
- E-commerce and affiliate marketing: Entrepreneurs managing multiple seller accounts on platforms like Amazon or eBay can avoid detection and prevent account suspensions.
- Social media and advertising: Digital marketers running ad campaigns across multiple accounts can operate safely without triggering platform security measures.
- Web scraping and data collection: Analysts using automation tools can bypass IP bans and access geo-restricted content without revealing their real identity.
- Crypto and finance: Users engaging in cryptocurrency trading or forex platforms can protect their financial activities from tracking.
Step 1. Get Infatica proxies

First, log in to your Infatica account and head over to the My Services section. Here, you'll find all the proxy packages you've subscribed to. Pick the plan you want to use and click the Generate button, and your proxy list will appear. Keep this window open – we’ll need it for the next step!
Step 2. Download GeeLark and add Infatica proxies
You can get GeeLark for your Windows, macOS, or Linux device from the official download page.

Let’s launch GeeLark and press the New Profile button in the left menu to create our first virtual smartphone instance:

In the next window, select the Single Create option; in the Proxy settings area, fill in these fields:
- Proxy option:
Custom - Proxy type:
HTTP - Proxy server: Use the host-port combination from Step 1 (e.g.
proxy.infatica.io:12345) - Proxy username (optional) and proxy password (optional) – alternatively, you can use your Infatica
username:passwordcombination for easier authentication.

As a bonus step, you can press the Check proxy button to perform a quick proxy test to ensure that they’re working correctly – GeeLark offers several geolocation APIs for these tests, including IP2Location:

Click OK to save this profile…
Step 3. Start GeeLark and check for leaks
… and navigate to the Profiles menu on the left to open the full list of profiles and launch the one we created:
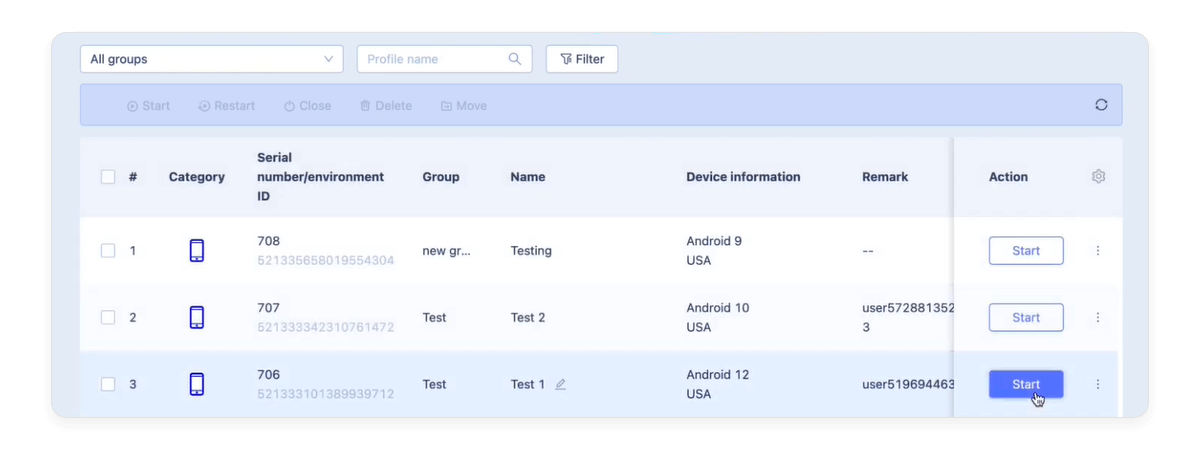
Now, let’s double-check that everything is working as it should and that your real information isn’t leaking. Press the Start button to launch a virtual smartphone instance and visit a website that detects leaks, like browserleaks.com.
On this site, you’ll see details like your IP address, location, and internet provider. It will also show other key privacy indicators, such as your browser fingerprint, WebRTC, and DNS settings. Take a moment to confirm that everything matches your proxy and that no personal data is slipping through. If everything looks good – great! You’re all set.
Frequently Asked Questions
GeeLark is an antidetect phone designed for online anonymity and multi-account management. Using proxies with GeeLark helps you change your IP address, avoid tracking, and access geo-restricted content without revealing your real identity.
GeeLark supports different types of proxies, but for the best security and reliability, it’s recommended to use residential or mobile proxies like those from Infatica. These provide real IPs and reduce the chances of detection or bans.
It depends on your use case. If you're managing multiple accounts, frequent rotation (every session or every few hours) helps prevent bans. For general browsing, a stable proxy that changes periodically should work just fine.
A slight slowdown is possible, especially with high-security proxies, but Infatica’s proxies are optimized for speed and reliability. Choosing a proxy server close to your location can help minimize latency.
First, check if the proxy is active in your Infatica dashboard. If it's still not working, try switching to a different proxy, clearing cache/data, or restarting your device. If issues persist, contact Infatica’s support team for assistance.


